|
|
|

Discussion Forums
Forum Index
> Rifles general discussion
> Tikka T3 build/bedding
Tikka T3 build/bedding

@ 01:05 am (GMT) |
Martin TaylorG’day All,Just thought l would post my new build, a Tikka T3 S/S 9.3x62 to show how l go about building up a rifle with Nathan & Steph’s help! It is being built as a stalking/hound hunting gun for use in our Alpine areas, targeting mainly Sambar deer. Robustness, reliability & practicality are the main priorities for this build along with being suitable for my sons to use if needed! l like all my rifles to group consistently so bedding is a must for long term repeatability. I will be using a TBR bedding kit and under Nathan & Steph’s guidance, even though they are in another country! After a wet day or weekend hunting l need to be able to strip, clean & reassemble knowing the zero is spot on! The stock is a Laminated Boyd’s Classic that l will modify to suit personal taste, increase grip levels and dull recoil with its extra weight along with a Limbsaver recoil pad. A stainless cnc’d recoil lug will be fixed into the bedding to replace the steel lug supplied by Boyd’s. This will leave the original stock to be stabilised & bedded as a light weight alternative if needed later on. Should be fun, I will post some pics when l start it over the weekend! Cheers Marty |
Replies

@ 02:13 am (GMT) |
Nathan FosterRe: Tikka T3 build/beddingThanks Marty, yep, we'll be here.FYI for other readers, via email, Marty and I have been talking about swaging .375 bullets to 9.3 as I would like him to be able to take advantage of the 225gr Interlock, not just for cost but also its excellent terminal performance. This will also allow Marty to utilize other .375 bullets if all goes well. Marty is going to try to swage .375" bullets to .365" in a modified .222 die. I think this will be the most exciting aspect of the build. I love this stuff. |
|
@ 07:49 am (GMT) |
Martin TaylorRe: Tikka T3 build/beddingThanks for the emails Nathan your tips are spot as usual!Hope the photo bucket works!!!!! Got to start the fitup today! Checked clearances, height & fit which was pretty good, better than other Boyd's that l have done! Marked out my points to keep as height gauges front and rear for now, then started to remove material around the rear tang. 
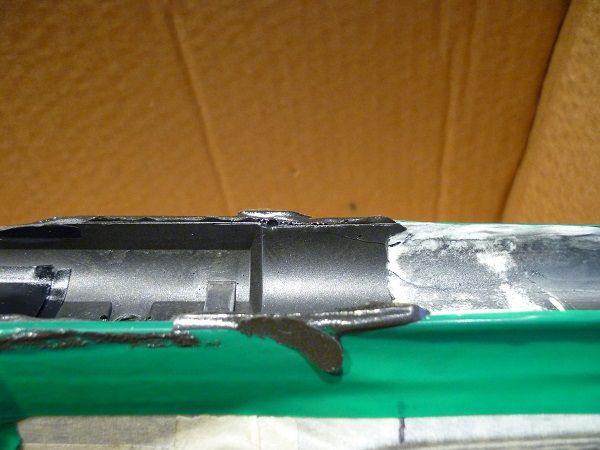
Cut a small channel along the action length, leaving the top 1/2mm untouched for now. I find the channel gives the burr a place to stop! Running up over the top through the protective tape is never fun. 
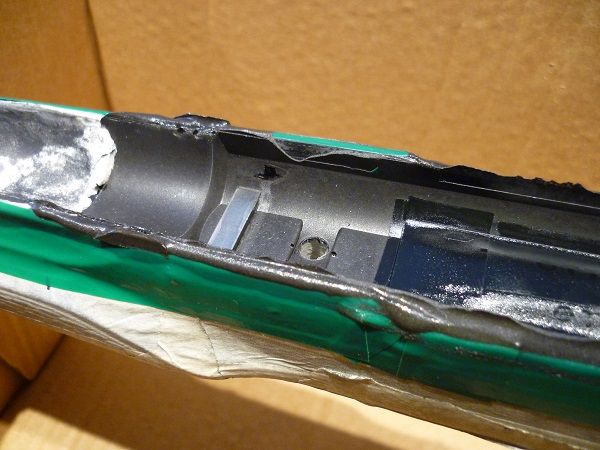
Here is the stock with all reliefs opened up, including the Ali lug well. The top 2mm has also been opened up and smoothed by hand. Plasticine is in, nearly ready for compound. 
All good so far! |
|
@ 06:28 pm (GMT) |
Nathan FosterRe: Tikka T3 build/beddingLooking good Marty! The wide opening in the lug recess of the stock will help ensure that the lug does not get bumped as you set the action and fitted lug into the mortice.If you get a chance Marty, could you please measure the diameter of your barrel at the 12" mark, then at the muzzle. I want to try and give Dave an idea of potential barrel diameters for his T3 rifle with regards to his post. Sorry to add to your job list. |
|
@ 06:51 pm (GMT) |
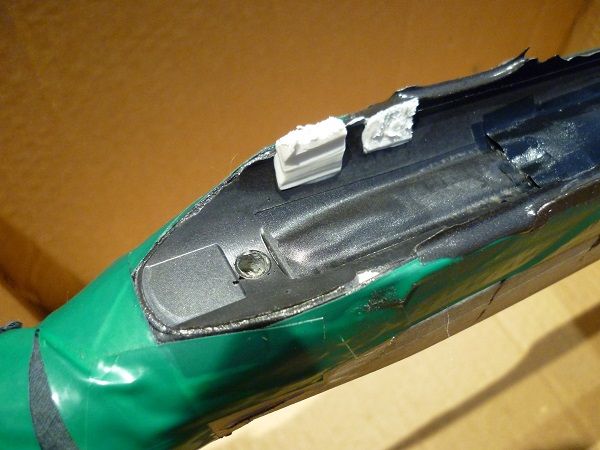
Martin TaylorRe: Tikka T3 build/beddingFirstly,Sorry didn't see your question until now Nathan, will check tonight! Yep lots of room around the lug to strengthen it with the compond. This picture is knocking the bedding down to the tape guide as in your instuctions. Just started to open up the mag well etc. 
Next pick is the finished result, all relieving & cleaning finished. A couple of very small bubbles on the rear tang, but very happy with the finish! 
Ready to sort out the trigger guard fitment now, will be bedding some S/S washers/pillars into the stock to setup the magazine clearances. Also going to try changing the tapered action bolts with flat seat S/S bolts, should stop the "pulling in" to the washers for good.. |
|
@ 08:30 pm (GMT) |
Nathan FosterRe: Tikka T3 build/beddingThat looks great Marty! Just great. Thanks for sharing.If you look closely at the fit of the current screw heads, you will see that they are slightly undersized and that they only just engage the washers in the plastic floor wear. It therefore goes that you don't have to fully trim the new screw heads to 9 or 9.2mm diameter. Take them down to 9.5mm bolt head diameter and trial fit them. M6 SS button / hex heads will be the go. |
|
@ 07:22 pm (GMT) |
Martin TaylorRe: Tikka T3 build/beddingGot the S/S M6 screws machined up yesterday along with the ferrals or locating pillars to setup the trigger housing.The recess in the stock for the trigger housing had incorrect angles & depth on the front mount plate causing the plastic to deform when tightened. So my fix was to epoxy these pillars into the stock at the correct height, fixing this and stopping the washers in the plastic housing deforming over time. 
Also honed the sear engagement after talking it over with Nathan, which is not the norm for a Tikka trigger but it's creep free now! |
|
@ 12:46 am (GMT) |
Nathan FosterRe: Tikka T3 build/beddingAgain, looks good. The ferrals should work a treat. |

@ 03:33 am (GMT) |
Ben LawRe: Tikka T3 build/beddingnice work,about to do my 338 win mag on a synthetic stock, prep work is done, hopefully turns out like yours. |
|
@ 05:28 am (GMT) |
Martin TaylorRe: Tikka T3 build/beddingCheers Ben,It's working up nicely, just modified the pistol grip & enlarged the palm swell today to suit my grip. Also painted on some wrinkle finish paint to give some more grip, the Boyd's need help with that! Will take a pic tomorrow, still have to balance the whole thing, just waiting for my scope mounts to turn up. Don't forget to stabilise your fore stock before you bed as per Nathan's advice! Did my sons 308W T3 like that and it shoots bloody well still, clover leafs at 100 with a cool barrel. Take your time and have fun! Cheers Marty[b] |
|
@ 06:07 am (GMT) |
Ben LawRe: Tikka T3 build/beddingI did the stabilizer a few weeks back.Its taken me a while to get through everything, busy life at the moment so i've had to chip away bit by bit at times when i've had the chance. Well the bedding compound is in and rifle is now curing in its hot box. I was going to do the hot knife trick along the edges but i'm not sure i'll bother with the sides of the action being straight and only an inch of the barrel bedded, the compound doesn't look to be over centre either. Only thing i forgot to do was apply release agent inside the pillars, there might be a bit still in there from when i glued them in. I should still be able to get the masking taped bolts out and clean up inside the pillars with a file or drill bit by hand. Looking forward to see how it turns out and getting out to see if its improved accuracy. |
|
@ 06:18 am (GMT) |
Ben LawRe: Tikka T3 build/bedding


|
|
@ 04:56 pm (GMT) |
Nathan FosterRe: Tikka T3 build/beddingHi Ben, it was just the photo location. You were trying to take photos from a slide show as opposed to your album. Just a matter of going to your album, select a photo, then go to the bottom right and click on copy image. All done now.The job looks OK but is missing its burn lines in the action area which burn off the petroleum while creating mechanical locks. This one may also have a few air bubbles- it may effect the aesthetics but won't effect function. The air bubbles would have been introduced during mixing and in the way the compound was poured. Not to worry, will just see how she goes. The screws will come out just fine. If you have not already pulled the job, I would like you to wrap the rifle in cling film and freeze it for 10 minutes before pulling the job- if you have a chest freezer. |
|
@ 07:37 pm (GMT) |
Ben LawRe: Tikka T3 build/beddingthanks for fixing the photo's Nathan.I decided against the burn lines, instead just drilled some 3mm holes every 10-15mm. My mistake. If the bedding doesn't hold i'll know why, just have to hog it out and do it again. I did plenty of burn lines in the forend as I didn't use the dremel or drill there. I did also get quite a few bubbles in the stabilizer. What's the best way to reduce this? I only stirred by hand, I wanted to make sure it was fully mixed though. |
|
@ 07:53 pm (GMT) |
Ben LawRe: Tikka T3 build/beddingAnd I haven't pulled the job yet, so I will put it in the freezer first.By the way the books were a great read, I like the way they are pretty much straight to the point and easy to read, but also very detailed. |
|
@ 09:04 pm (GMT) |
Martin TaylorRe: Tikka T3 build/beddingHi BenThe bubbles are reduced by settling the mixture in the bowl first, l do this by banging it on the bench after mixing & making sure it is a little warm first as the bubbles rise easier. Don't panic you have heaps of time with this! Then poor it in very very slowly not letting it whip as you poor, the bubbles pop if you poor thin lines. You can find a better explanation of it on Nathan’s u-tube bedding tips video, maybe the newest one that Steph shows us up in!! One thing l hate to tell you is that you haven't given the parallel section of the action any relief! Have a look at the pictures in your instruction sheet. The green tape in the lower picture should run all the way down this Parallel, to the first angle giving the action room to move "during the recoil/battery harmonics if you will". You can lightly sand this after to give it some room to move, but email Nathan to check and he will give you the best options! Cheers Marty |
|
@ 09:10 pm (GMT) |
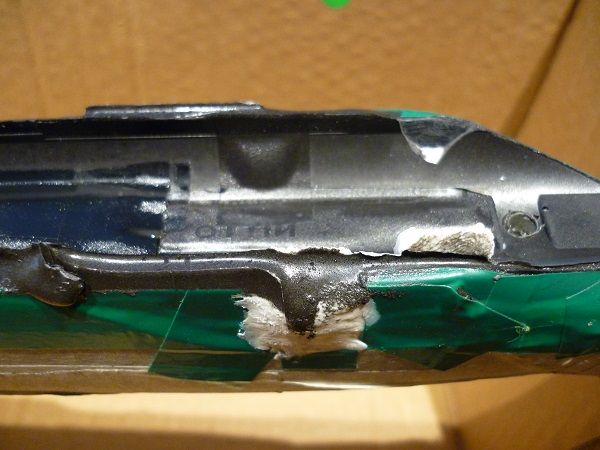
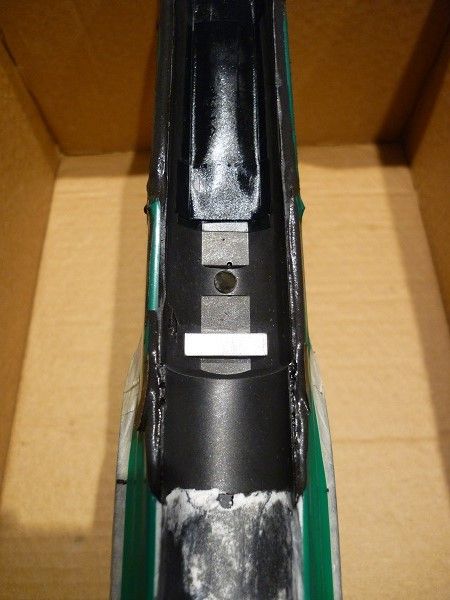
Martin TaylorRe: Tikka T3 build/beddingJust noticed Ben, if you look at my 3rd picture (its bloody hard to see) the black insulation tape is just visable on the side of the action.[b] |
|
@ 08:25 am (GMT) |
Ben LawRe: Tikka T3 build/beddingso i pulled the action from the stock, after after freezing for 10mins in cling wrap.didn't look too bad at 1st. only a couple very small air bubbles and a bit bigger one near the recoil lug. but a couple of pieces of compound chipped out near the edges. i started cleaning it up, done a bit of a rough job really, lost a bit of motivation for perfection now the jobs not perfect. ill finish cleaning it up, put it back together and see how it shoots. not sure what i'll do with it yet, might grind it out and try to redo it properly or consider a laminate stock. by the way Marty, sorry for hijacking your thread, i hope you don't mind too much. few pics... 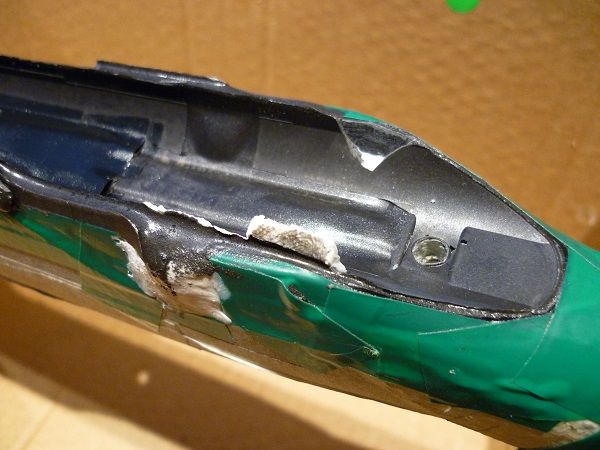
|
|
@ 04:55 pm (GMT) |
Nathan FosterRe: Tikka T3 build/beddingHi Ben, with some care, I think that will clean up OK.Try to give it a basic clean up- then check fit. This thread has caused a few phone calls for me, folk concerned about sidewall relief. So I want to go over this again here. Parallel side walls can become trapped to be sure. This can pinch the action and prevent the rifle returning to battery after each shot. The result of a pinched T3 is normally double grouping. During bedding, there are three ways to approach sidewall relief. 1. make sure plenty of release agent is used, then powdered graphite. 2. tape off the side walls with electrical tape. 3. If the use of heavy release agent and graphite did not work, hand sand the sides, counting passes (as per book 3, as with all of this info). The one problem with taping sides, is that if you have an action that consists entirely of straight sidewalls, it leaves little else to bed. The Ruger M77 is a good example. Personally, I take the risk and use release agent dabbed on to a good layer, then graphite. After the bedding and initial clean up, the job can be checked for fit. if it is extremely tight, then we need to get in with fresh sand paper and count passes on each side, doing our best to relieve the side walls in an even manner. The same can be done with a bead blaster providing other areas of the bedding are properly masked off. |
|
@ 04:58 pm (GMT) |
Nathan FosterRe: Tikka T3 build/beddingBen, the third book has tips for back filling / rework. But for now, clean it up and check fit.Your job will be somewhat tight just before the action fits over the lug. Common sense will dictate whether the job is so tight. If you really have to "walk" the action out of the stock, then you will want to relieve the side walls. |
|
@ 05:51 pm (GMT) |
Martin TaylorRe: Tikka T3 build/beddingBen as Nathan says don't give up just yet!Even though you may have some areas that are not perfect you will have good contact in plenty of others, relieving as instructed and as necessary. This Tikka is not my first by a long way, l have had many failures & rework’s. Some of my ugly ones have shot very well, as well as any others! My two experiment rifles a Howa 1500 & Marlin XL7 where bedded both ends instead of full bedding at first and worked very well. All l am saying is clean it up and whilst doing it you will develop your technique even further, then if it shoots all’s good. If not, again follow Nathan’s instructions. If you get large breakouts in the bedding you will have to look at a redo with the knowledge learnt from this one! Have a look at my 2nd pic, heaps of mechanical lock! And l like that you have posted in this thread, thanks! I was hoping that it would get people talking about their bedding jobs & techniques! it is the one thing that’s been missing in the forum chats! A few of Nathan’s gazillion emails may be worked out on here as most of us have bedded our rifles with Nathans help. I heading off to test mine this weekend along with some very basic load development so will post a few mores pics Monday. P.s. Sorry about the calls Nathan! |
|
@ 07:31 am (GMT) |
Ben LawRe: Tikka T3 build/beddingthanks for the advice fellas!had a quick look at it earlier, i guess its not too bad, will probably do the job for now. i'll hopefully get it cleaned up and do some test firing next week. but i'm sure i could do a better job 2nd time around. marty, how did your xl7 come up? i have one in 30/06, i might consider doing it oneday. |
|
@ 08:07 pm (GMT) |
Martin TaylorRe: Tikka T3 build/beddingBen the XL7 is one of the easiest bedding jobs you will do, just behind the Remingtons! Just make sure you tape off the lock nut and work some release agent into it.I have found the factory stock to be "wanting" so my 30-06 is wearing a Boyd's thumbhole. It's well under moa without fuss! Got the new Tikka into the hills, one 250gr load just under moa & l'm happy with that for this rifle with it's intended use. Recoil was a gentle rolling push as said by others & very user friendly. As Nathan has said l will resize .375 225gn interlocks when they become avaliable again! Just need to take a small amount of material out of the butt to balance the whole package & job done. Took a yearling for meat on its first trip and l liked the calibres 1st performance, but time will tell. 
|
|
@ 07:52 am (GMT) |
Ben LawRe: Tikka T3 build/beddingstock cleaned up best i can get it with grease rubbed into the bedding.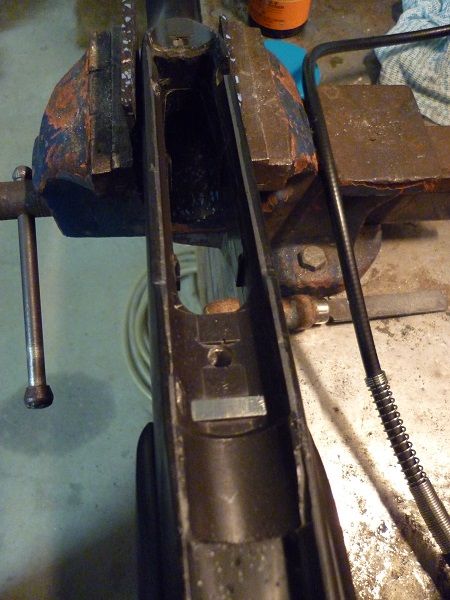
all back togeather, action screws torqued to 55in lb. couple of imperfections, but looks alright assembled. 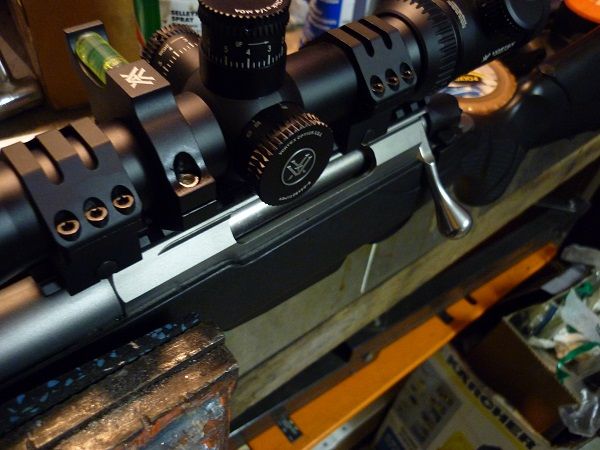
now off to the range. |
|
@ 05:02 pm (GMT) |
Nathan FosterRe: Tikka T3 build/beddingNo photos of the yearling Marty? The rig looks good. The wrinkle paint has a really nice look about it.I hope everything goes well at the range Ben. |
|
@ 07:18 pm (GMT) |
Martin TaylorRe: Tikka T3 build/beddingIt may suprise you yet Ben!Watch the torque on the action bolts, keep an eye on the washers! They are taper headed bolts on a unsupported flat washer! You may need to back it of a bit if the washers start to deform. Sorry no autopsy pics Nathan, you said you had tested these 285 Privi's already and it was shot @ 25 yards, my bad! I will pm you the shot details & resulting damage. Very happy with the overall package, if you look carefully at the photo there is a small amount of slip on the front grip, this was after the 15 shot break in/development. Being so cold here the paint had not fully dried in the underneath layer. I have refinished it and will leave it be for a couple of weeks in the warm. |
 Please wait
ABOUT USWe are a small, family run business, based out of Taranaki, New Zealand, who specialize in cartridge research and testing, and rifle accurizing. |
KNOWLEDGEBASE |
KNOWLEDGEBASE |