|
|
|

Discussion Forums
Forum Index
> Rifles general discussion
> How to proceed?
How to proceed?

@ 08:54 pm (GMT) |
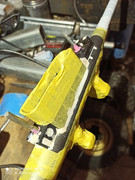
Kerry HewittHi all. Im a newbie to this forum and to bedding rifles but super keen.I have got a boyd stock and so need to bed my action to it. I have bought a kit and the book from Nathan, very informative and huge amount of info there. I understand the concepts and am rearing to go but i am a little lost on how to proceed with my rifle. I have a styer pro hunter. The lug is bolted on to the action and also holds the mag housing in place. It has an interesting shape to try and tape up. I am planing on front and rear bedding at this stage not a full length action bedding. Attached (hopefully) is a pic of the lug. What are your suggestions? I was planning on leaving the mag housing attached and following the shape on the front of the lug. Is this right in this case?. Thanks Kerry 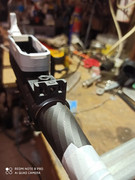 img] img]
|
Replies
|
@ 08:56 pm (GMT) |
Kerry HewittRe: How to proceed?[img[url=https://postimg.cc/NLxJtMVL]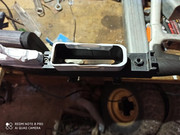 [/url] [/url]
|
|
@ 08:57 pm (GMT) |
Kerry HewittRe: How to proceed? |

@ 02:48 am (GMT) |
Ricardo LaborinRe: How to proceed?Kerry is it a Steyr SSG 69? |
|
@ 05:46 am (GMT) |
Kerry HewittRe: How to proceed?Hi Ricardo.Its a pro hunter. One of the early ones i think i brought it about 1996. |

@ 07:44 am (GMT) |
Nathan FosterRe: How to proceed?Hi Kerry, at the front of the lug, use plasticine to plug the recesses.Use plasticine to plug any trap points at the sides- not just recesses but also any contouring that may trap the action. At the bottom of the lug (or top as you see it here), use nail polish (a bright colour jobby). Pick yourself up some nail polish remover at the same time for the clean up. At the nut, run tape around the nut, keeping it tidy. Use nail polish on remaining exposed areas. If you cannot get tape to adhere to the nut, use nail polish all over (then release agent). I want to make this utterly clear to all readers, Kerry will one way another, whether in his first attempt or thereafter, make a go of this. But is is through no thanks to the bastards who made this rifle or who saddled the NZDF with a rifle featuring a trigger of about the same quality as a rushed Mosin. What we are seeing in the above photos, is the very beginnings of the cost cut rifles that came thereafter. If you want to buy a new rifle of this ilk, you may as well go the whole hog and tell the gun store salesman "no sir, I don't need a carry case", then turn around, pull your pants down and bend over. Perhaps if there is still room, the guy might be able to fit you up a Sauer 100 at the same time. The finished quality of this rifle will be reflective of Kerry's ability to overcome these difficulties. Not an easy task. I am really pleased to hear that you have found a Boyds stock as the Steyr plastic has always been a major weakness. With the Boyds, you can cut and hack into the stock without having to worry about major mistakes. You can also whale on the barrel with a mallet if the job becomes trapped, hopefully without too many woes. If some material comes away, you can start all over without it being a problem. If you need more help Kerry, please get in touch directly. Will do my best to help you through. |
|
@ 12:14 pm (GMT) |
Kerry HewittRe: How to proceed?Thanks Nathan.I appreciate your taking time to help me out. That all makes sence to me and i guess we will see how it turns out. I have been enjoying going through your youtube vids as welland looking forward to the next live episode. Cheers K |
|
@ 07:53 pm (GMT) |
Kerry HewittRe: How to proceed?https://postimg.cc/nM2d7Bt7Prep in progress. I notice in your videos Nathan or should that be steph? you protect the muzzle with lots of tape and wrap so i have added more protection there too. |
|
@ 07:54 pm (GMT) |
Kerry HewittRe: How to proceed?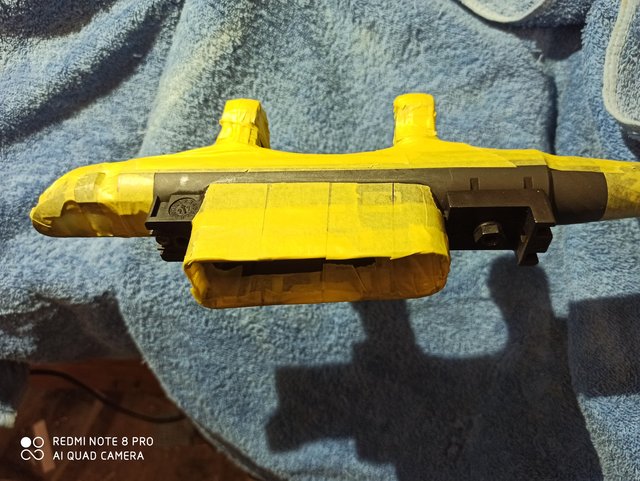
|
|
@ 08:51 am (GMT) |
Nathan FosterRe: How to proceed?Just in addition Kerry, you will need a tidy layer of tape on the sides of the lug block. Then, as previously suggested, plug gaps with plasticine.Also plug between the mag well and lug block with plasticine. |
|
@ 09:18 pm (GMT) |
Kerry HewittRe: How to proceed?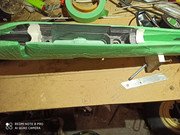
Getting there. |

@ 10:54 pm (GMT) |
Paul LevermanRe: How to proceed?Kerry, is that bolt head on the recoil lug going to cause an issue? Not so much for the bedding, but when it comes time to knock the action out. I can't really see if you've taped it or not. If it is difficult to get a good tape job, I've found that two or three coats of nail polish will give the necessary clearance for a good release. I may be way off base here, not having the action in front of me and just going by the photos. |
|
@ 10:57 pm (GMT) |
Paul LevermanRe: How to proceed?Never mind, I just re-read the whole thread and Nathan already addressed this issue. Sorry. |
|
@ 06:46 am (GMT) |
Kerry HewittRe: How to proceed?Thanks Paul. Never hurts to be advised twice. It shows thats the right info. 😃 |
|
@ 09:25 am (GMT) |
Nathan FosterRe: How to proceed?Hi Kerry, if you are still at the prep stage. Here is what I think you would best do next:Action: The mag box can be coated with lee case sizing wax and left to set hard (can be done after applying our release agent). Stock: Cut the tape from the bottom of the mag well so that the mag well can act as a drain. You will need to use a piece of foam as a temporary dam in the mag well. The barrel channel dam looks shorter than the tape line on your action? I would like you to make sure the front dam is set as far forwards as it can go relative to the tape line on your action. The barrel channel dam is also short. Try to build the dam longer - without altering the height. In other words, build it up bit by bit. Dust powdered graphite onto your plasticine dams etc so that the plasticine does not lift your during the many trial fits you need to employ in order to get this right. At the front of the mag well, the stock needs a ref point left at its original height - a sliver of about 1mm of untouched stock material, as talked about in the tips and tricks video. This is very important as it will help prevent some seepage down into the mag well. Your stock inletting should step down ahead of the ref point. At the sides of gthe stock, again at or near the front of the mag well, you may wish to use sidewall dams (worms) of plasticine to prevent the compound seeping out along the sides of the action / magazine. Ideally, we want to keep the compound in the area in front of the mag well, nothing back from this point. Instead, the first inch of the barrel will be the area of most stability along with whatever flat is obtained at the lug assembly. There may be some leekage / seeping into the mag well / behind the lug block. There may not be much that can be done about this other than to ensure that the ref point sandwiches the job in place. At the rear just behind the mag box, use a blob of compound on the flat - not enough to go up the side walls. Some will seep up, but this can be dremelled away afterwards as you set about giving the job and nice finish / borders etc. Although I put function first, there is a level of artistry that brings about its own joy during the final clean up. Example of ref point: https://youtu.be/cB_zxg2VnbY?t=126 |
|
@ 12:27 pm (GMT) |
Kerry HewittRe: How to proceed?Thanks Nathan.Yup im still prepping, im being careful to take my time and try and do it properly being my first time. Thanks for everones advise and help. You guys rock! |
 Please wait
ABOUT USWe are a small, family run business, based out of Taranaki, New Zealand, who specialize in cartridge research and testing, and rifle accurizing. |
KNOWLEDGEBASE |
KNOWLEDGEBASE |