|
|
|

Basic Rifle Accuracy and Ballistics
A Basic Guide to Rifle Accuracy
As a hunting guide the biggest problem I am faced with (besides locating game) is in-accurate rifles. Before each hunt, I advise clients that long shots of around 300 yards are very common on our hunting blocks. I then ask each client to check their rifles carefully to ensure that the rifle is both accurate and zeroed appropriately for the ranges we will encounter.
Unfortunately we are finding that eighty percent of the rifles brought here for hunting are not capable of even basic accuracy. Think about that, for every ten rifles you are seeing on the gun store walls, two at most, will be accurate and these, in my experience have been more of a fluke than good management. I remember many years ago a gunsmith said to me, you will never see an accurate rifle on a gun store wall as nobody will sell a good rifle, so true.
Of the in-accurate rifles that come here, some have been brand new high end designs, others have been basic production sporting rifles. Many times, clients have had to give up after their rifle shot all over the target at the range and use one of our back up rifles for their hunt.
What is an Accurate Rifle?
Definition of an Accurate Hunting Rifle
First the shooter needs to define – what is an accurate hunting rifle? This is simple; if the rifle will be used out to 300 yards or beyond, it will need to be capable of grouping 1” (one inch) or less at 100 yards. If the hunter only gets perhaps one 300 yard shot per year, the same level of accuracy is still required as that shot may be the only shot the hunter will get for the season.Bush hunters don’t really need a high level of accuracy. Along with this, rifles such as the Winchester lever action model 94 rifle often have fairly crude open sights that do not allow much in the way of precision shooting beyond 150 yards. The Winchester model 94 angle eject (A.E) rifle can be fitted with a scope but hunters will usually opt for a low power scope, again more useful at closer ranges. Another limiting factor is the trajectory of the brush cartridges. Nevertheless, regardless of the lower accuracy required from brush guns, many are very accurate straight out of the box.
Another, older theory on the accurate rifle goes like this - a hunting rifle should be accurate enough to hit game vital zones out to as far as the shooter can aim using the rifles sighting system. In plain terms, using a modern variable power scope set on 9x magnification, most (if not all) people can place the crosshairs on target with reasonable precision out to 300 yards. It therefore goes that the rifle needs to be able to place the bullet accurately at 300 yards, which necessitates a grouping of 1” or less at 100 yards for this to take place.
Definition of the In-Accurate Rifle
If a rifle produces groups of around 1.5” at 100 yards, it is unsuitable for 300 yard shooting. This small level of in-accuracy is enough to create misses or brisket wounds with vertical deviation and will result in gut shots with horizontal deviation.If a rifle produces groups of 2-3” at 100 yards (common with factory sporting rifles), it is unethical to shoot at game at ranges of 200 yards and beyond.
It pays to remember that results gathered from the range have less human error than those in the field. A 1.5” group at 100 yards when shot off sandbags becomes a 2” group when using a day bag as a rest in rougher field conditions.
Is it Me? Am I a Bad Shot?
Generally speaking, if a highly accurate rifle (sub inch group capable at 100 yards) is given to a “green” over enthusiastic teenage boy, he will usually shoot groups of 1.5” on average. A more astute teen will shoot groups of about 1”. An adult, inexperienced but attentive will shoot a first group of around 1” with consecutive groups closing down into the three quarters of an inch region.From this it can be concluded that most people are capable of shooting accurately with almost no experience if they are 1) given an accurate rifle and 2) set up appropriately. A most important factor is that the shooter set a realistic level of expectations for him or herself. The shooter does not need to be a competitive benchrester to shoot accurately. As long as the shooter has a good rifle, good ammunition and a few basic shooting habits, sub inch groups at 100 yards are not only achievable, but normal.
How to Sight In
Whether the shooter uses a club range or steps out 100 paces on a farm, it does not matter as long as this distance can be obtained, rather than the less ethical 25 to 50 yards over the car bonnet. For a target, the simplest method is to use white photocopy paper with a black dot label on it. Black 1” dots can be purchased from stationary supplies (sold as labels). A slightly better set up is the use of a computer generated, photocopied target. A simple heavy black ring with a white center is perfect. The white center should be about three quarters of an inch in diameter.For those who do not have good eyesight, black cartridge paper with a white 1” dot label is better. A white dot on black appears bigger to the human eye than it actually is, a natural optical illusion that aids accuracy greatly.
When setting up a position to shoot, lying down is the easiest for the beginner. A purpose made bench is an excellent aid but unless it is built solid and heavy along with a preconceived idea of shooting positions, it can easily become a hindrance. For rifle rests, sand bags are the ultimate. These can be made by simply cutting out the legs of old jeans, filling them with sand and tying them off with insulation tape - no drama. Sand bags should be placed under the fore end of the rifle and under the butt stock, just behind the pistol grip.
The purpose of range work is to study how the rifle shoots, NOT the shooter. In order to do this, the shooter must be comfortable, the rifle and sand bags jiggled around to suit. The rifle should be resting firmly and should be easy to aim and keep settled on target.
Trigger control is a major factor in accuracy. A heavy creepy trigger can open groups right up and is the number one contributor to flinching. A good crisp trigger should have around 2lb pull. To some, this seems very light when first used and less experienced hunters will have fears of the trigger going off before they are ready to shoot. The key here is to learn how to use the trigger properly. The only way a 2lb trigger can be dangerous is if the rifle is used in an irresponsible manner.
HAVING YOUR FINGER ON THE
TRIGGER BEFORE THE ACTUAL MOMENT OF SHOOTING IS DANGEROUS.
Guide lines for trigger control:
#When either sighting in at a range or walking with a rifle in anticipation of seeing game DO NOT place a finger on the trigger. The trigger finger can lie gently along the trigger guard and still allow for a very quick shot.
# While preparing to take a lying down shot DO NOT place a finger on the
trigger.
# When the target is sighted, whether paper or game, it is still inappropriate to put a finger on the trigger.
# Once the crosshairs are resting on the bull of the target or on the vitals of an animal, THEN, it is time rest a finger lightly on the trigger.
Resting the mid tip of the index finger on the side of the trigger gives an excellent feel. One then needs only to bring the finger around slightly and take up tension. As the tension is taken up, the trigger goes off and yes, it should go off almost before the shooter is ready. This action disables the human brain from being able to anticipate the recoil, thereby preventing the shooter from “pulling” the shot off target.
Some folk talk about a heavy trigger being acceptable, especially on a medium or big bore magnum such as the .375 H&H or 416’s. The truth is, the higher the recoil, the more need there is for a light crisp trigger to counteract flinch. If using a 460 Weatherby, the shooter needs a light trigger more so than someone who uses a .223 Remington. It makes no difference whether the shooter is a laborer with calloused fingers or an office worker, adopt a light crisp trigger and learn how to use it accordingly.
If the trigger is immensely heavy and creepy but adjustable, do not bother trying to sight in, it is a waste of time and ammunition. Many brands of rifle are designed with adjustable triggers while various other brands benefit from trigger modification. A competent gunsmith can either adjust or modify most brands of rifle.
While much of range work is all about determining whether the rifle can shoot adequate groups in a repeatable manner, the rifle also needs to be zeroed in such a way that once the shooter leaves the range, the rifle shoots to the same point of impact in the field. If the shooter uses a bipod at the range and then adopts a daybag as a rifle rest in the field, the rifle will shoot to a different point of impact. If the shooter intends to hunt with a sling, the sling must be used when sighting in. In essence, while testing the rifle at the range for accuracy, it is just as important to solidify hold techniques and rests that can be transferred to the field and yes, sandbags and day bags are complimentary.
With high powered magnums or ultra light rifles in .7mm08, .270 etc, be aware that a sling is a great aid to total accuracy and a tight sling hold can bring groups down by 50%.
Below is a range checklist for the final moments prior to firing.
If using sandbags, make sure the rifle barrel is not touching the sand bags. Check with each shot.
- If a sling is to be used, make sure it is under a little tension as it passes under the elbow.
- If lying down, spread legs and keep inner ankles flat on the ground.
- Feel, check for feel. The shooter needs to have a firm but not tight feel of the fore end (a pinch). The same goes for the pistol grip, even if it is just between the little fingers and lower palm, it is all about control. On the magnums, a heavier grip is required and shooters should take time to experiment with this.
- Time, the shooter needs to be patient and take as much time as needed when making each shot. If the moment is lost, the shooter should cock his or her head to one side and have a break. There are no first prizes for being a fast shot when sighting in a rifle.
From a clean copper free barrel, the first shot will often be way off from the normal grouping, called a fouling shot. This shot puts a layer of copper onto the inside of the barrel and the next shot will most likely gain about 50fps in velocity. After about 150 to 200 rounds, the problem will re-occur, this time due to too much copper fouling.
If the rifle has a copper fouling problem, it will produce flyers. These appear as random bullet holes about 3” off target. To remove copper, an ammonia based solvent is the best.
After firing, the shooter will have an immediate inkling of whether human error could have played a factor in the result. Generally, if it felt like a good shot, then it was. If it felt like a bad shot, it was. If it felt like a good shot but the bullet hole is miles off where it should be - BLAME THE RIFLE.
To measure groups, use a ruler or vernier caliper. Of the shots that comprise the widest part of the grouping, measure from center of bullet hole to center of bullet hole to establish the group size.
If undecided about human error, think about this. If the shooter is wavering slightly while aiming, it is usually within the region of .5”, not several inches. If the rifle shoots, for example, 3” off to the left, it is still the rifle that is to blame.
Whether one shoots a 3 shot group or 5 shot groups is a personal thing. If shooting 3 shot groups, the chances of a fluke tight group are very high. For this reason, if shooting 3 shot groups, at least two groups should be shot.
For more information on shooting technique, please click here
The In-Accurate Rifle
Excluding human error, the three variables of rifle accuracy include the rifle, the ammunition used and the scope.Ammunition
To clear up ammunition issues, factory ammunition usually shoots very well and is a good starting point in problem solving, especially for less experienced hand loaders. This is because the new brass forms in a complementary manner to the rifle chamber and factory loaded projectiles are seated with good concentricity to the bore. Brands such as Federal will usually shoot around .75” in a rifle capable of sub inch groups at 100 yards.In some cases, the more finicky of rifles will produce varied results with factory ammunition. This is often due to the pressure and velocity developed by the ammunition and its contributing effect on barrel harmonics. In some barrels, particularly welterweights, a slower factory load will produce best accuracy. As another example, in some long throated rifles as well as some heavy barrel rifles, a fast factory load will tighten things up considerably. In all of these examples, an optimum factory load might group around .75” while the less suitable load may open groups up to 2.5”. These parameters appear to be the average.
Handloading adds another set of variables however; a few myths can be cleared up here. The first is that a change in powder brand will dramatically alter groups, this is simply not true. If the rifle shoots 3” groups with H4831 powder at 60,000psi, it will shoot 3” groups with H4350 at 60,000psi. Altering seating depth by a few thou (.2mm) back and forth will not dramatically alter accuracy either. Concentricity of projectiles to the bore is far more important when looking at finer problems. Powder charges should be worked up according to the manufacturer’s specifications. Some rifles will produce good groups with mild changes, others producing best groups at maximum listed charges. Other rifles may not reach optimum pressures until the charge is lifted well above maximum listings although this author cannot condone such practices in print.
Generally speaking, if a handload has been made in a responsible manner following manufacturer’s data, taking bullet weight versus barrel twist rate into consideration, the rifle should have the potential to group around 1 inch or less. For competitive work, altering powder brands and seating depths helps squeeze out the utmost in accuracy but is irrelevant to problems with gross inaccuracy.
The Scope
Today there are a vast number of brands of rifle scope on the market. With scopes, you definitely get what you pay for. Cheap Chinese produced scopes are prone to field breakages, Japanese scopes tend to be clear and reliable while the very best have to be the U.S made scopes. One factor that receives little attention but should be the number one priority when using a high power rifle is eye relief. If a scope has minimal eye relief, the shooter must bring his or her face very close to the scope. With little clearance between the shooter’s eyebrow and scope lens, a high recoiling rifle will jump into the face of the shooter and either strike the eyebrow or cause a severe flinch. Many modern ultra lightweight rifles chambered for seemingly mild cartridges like the 7mm08 produce significant recoil and should always be fitted with generous eye relief scopes. The best of the best scopes at this time of writing, for both eye relief and reliability include Nightforce and the Sightron SIII series optics. Nothing else comes close.Bases should be attached to the rifle with a light shim of two-pot resin to take up any gaps and minimize vibration. The screws of the bases and rings should have a dab of Loctite thread locker on them. This will allow the user to tighten the screws up to a firm feel without any need to over tighten them. Clean up surplus resin with cotton buds. Beware of young gun store staff that have a tendency to use no locking compounds and opt for brute force, this sometimes results in damaged threads.
Also, beware of cheap aluminum rings, as some brands are much weaker than steel rings. Also, be very wary of rings that have windage adjustments on both rings, rather than just the rear rings. The problem with having both rings adjustable is that often the shooter will unwittingly bend the scope if the rings are not truly aligned and destroy the internal mechanism of the scope without even realizing it.
To align the scope for cant (tilt), line the vertical crosshair up with the tang or bore as the reference point. Nip up the scope rings lightly then go away for a few minutes before returning to check on alignment. This helps prevent confusion with optical illusions. Assuming the scope is mounted correctly but the rifle produces a poor group, the shooter must determine if the scope is a part of the problem. As a guide, if groups are big but consistent in shape, the scope is not the problem. A damaged scope will usually produce quite random results. Such a scope will often put two shots here, two shots there as its reticule plane jumps from resting point to resting point within the internal mechanism.
One way to remove the scope as a variable (as well as ammo) is to try the following:
Remove the barreled action from the stock, make up a stout rubber packer at least 120 thou thick (3mm) and about one quarter inch (or 1cm) square. Place the packer at the for end of the stock so that when the barrel and stock come together, the tip of the barrel will be squarely sandwiched in place (pressure point bedding). If groups come down in size a tad, it is the rifle and not the scope and indicates a problem with either the bedding or a flaw in the barrel.
The Rifle
Having established that human error is not an issue and that neither is the scope or ammunition, the shooter should look for clues by observing groupings. Group patterns help greatly in diagnosing the rifle as the potential problem.A grouping that is consistent in form but of a size of around 3” is indicative of poor bedding (the most typical problem which needs to be rectified by a gunsmith or skilled hobbyist).
A grouping that “strings” vertically or horizontally is indicative of poor bedding.
A grouping that appears randomized, of a diameter of around 5 to 6” is indicative of a mechanical floor in the rifle metalwork, particularly the barrel. The rifle needs to go to a gunsmith.
A grouping that closes up with pressure point bedding is an indication of either a flaw in the bedding or a problem within the barrel. The rifle needs to go to a gunsmith.
Bedding
The rifle is without a doubt a tool of magnificent precision. To throw a small piece of metal out to great distances with accuracy is truly a remarkable achievement. In order to do this the number one rule is that everything needs to be the same on each shot. The shooter needs to be in the same position for each shot; the ammunition load must be the same as the one before it while the rifle needs to produce the same results each time.With each shot, the rifle action and barrel moves, oscillates and vibrates. The best way to picture the barrel is by using the analogy of a baseball pitcher. As the pitcher throws his ball, the slightest difference in his point of release will change the point of impact at the batter. The rifle barrel is just the same and “whips” with each shot. If the barrel is unable to whip the same way each time, the bullet will strike to a different point of impact.
The action also undergoes stress within the stock. As the shot goes off and produces recoil, the action is forced backwards and then returns forwards. If the action does not return the same point with each shot, (this term called “battery”) then the rifle will be in-accurate.
To set up the best platform for accuracy potential, gunsmiths and custom rifle builders “bed” the rifle and free float the barrel. Bedding involves filling the gun stock with an epoxy resin (plastic), usually reinforced with powdered steel particles. The action is then set down into the resin which when dry, creates a mirror image of the action. The mirror image of the action is a precise bedding platform which allows the action to recoil and return to battery with each shot. This explanation is however oversimplified as several areas of the action need to be relieved to create stress free points and allow for the piston like movement of the action within the stock.
Once the action is bedded, the barrel can be free floated. This involves removing all wood or plastic along the barrel channel so that the barrel has no contact points with the barrel to interrupt its natural whip. The only point of contact should be the bedding under the barrel “parallel” closest to the chamber. This helps ensure that the action does not have to hold all of the weight of the whole system.
To check whether a rifle is bedded properly, remove the barreled action from the stock. The bedding is instantly recognizable as a layer of resin that appears as a mirror imprint of the action.
In some cases certain brands of synthetic stock (plastic) will make it unquestionably impossible to obtain a rigid bedding platform. This is because as much as the resin is stout, the rest of the stock still moves and compresses under recoil. One can easily check if a synthetic stock is going to be a problem. To do this, disassemble the rifle. Hold the stock, one hand on the pistol grip and the other on the fore end and try to twist the fore end. If the fore end twists very easily, it needs to be either reinforced or discarded and replaced with either an after market fiberglass stock or a custom crafted wood stock.
To reinforce a plastic stock, the whole fore end needs to be filled with a stiffener. Some smiths use aluminum or steel skeletons, some smiths use resin or fiberglass and some, like myself, use a mixture of both methods. Once the stock has been reinforced, the rifle will need to be bedded. Without a doubt, if the hunter is seeking outside help to remedy a flexible plastic stock, it is imperative that the hunter find a smith who is willing to come on board and do all that is necessary to optimize the stock. A simple bedding job simply doesn’t cut it in many plastic stocked rifles, particularly the Savage brand.
It is important to remember that as the power of the cartridge is increased, so is recoil torque to the bedding platform. The .378 Weatherby based cartridges and Remington Ultra Magnums need a strong bedding platform to obtain lasting accuracy. As these cartridges are often used at long ranges, again, the hunter should expect nothing less than groups of 1” or less at 100 yards. As long as the bedding platform is sound, cartridges such as the .378 Weatherby and .375 Remington Ultra Magnum can and will shoot sub inch groups.
No doubt, many readers will want to know what the arms factories do with regard to bedding. Unfortunately, bedding is too costly a procedure for most factories to perform. Instead, on typical production sporting rifles, the rifle is assembled in such a way that the barrel is forced upwards at the tip of the for end. This point of force is called pressure point bedding. Pressure point bedding will usually allow a rifle to shoot groups of between 1.5 to 3” at 100 yards. If the groups are consistent, there is a high probability that the rifle will be a tack driver if it is bedded properly.
Never ever free float a plastic stock without bedding the rifle. An unbeddded free floated plastic stocked rifle may produce groups as wide as 2 feet at 100 yards.
On wood stocked rifles, pressure point bedding will eventually become a problem as moisture shifts the stock around. This method of bedding is also only suitable for three shot groups at best because as the barrel heats up, the fore end is able to push it higher and higher. If however a barrel is left to fully cool right down over a very long period between each shot, pressure point bedding can allow for some good groups.
One marketing trend to be wary of is the so called pillar bedding. During the true bedding process, steel pillars can be fitted to ensure that when the rifle action is screwed down onto the stock, the stock does not compress over time. This is of particular importance with wood stocks as these soak up oils and can become spongy over the years. A current factory practice however, is to insert pillars (steel tubes) but with no bedding. On top of this, it is usually done to synthetic stocks that cannot soak up oils. This is a non-productive practice.
In truth, pillars can really be made out of any stout steel material. Full pillar bedding is a laborious, tedious task. In some cases, it is just as easy to insert a piece of stainless wire vertically through the stock wood as a pin to arrest stock compression.
One re-occurring mistake I have seen is hand loaders misreading bedding problems as signs of maximum pressures. Many hand loaders have been caught out with this and I dare say many readers have probably had the same problem. In this case, the shooter buys a new rifle, works up loads one grain at a time and discovers that at X grains, groups open right up. Later on, the load is put over a chronograph and it is discovered that the load is traveling 300fps slower than what should be the optimum pressure/velocity. The culprit is the bedding - as powder grains are increased, so does recoil torque to the bedding platform. If the bedding platform is unsound, groups will open up. Shooters using magnum powered cartridges are prone to this trap and often the load is 300 to 400fps below the optimum balance of velocity versus accuracy once the rifle is properly bedded.
Mechanical Flaws
Mechanical flaws involve problems in either the barrel or action. Problems that typically occur with barrels include poor heat treatment during stress relieving, muzzle burrs and chambers cut off center to the bore. These problems are very common and can occur not only in budget brand rifles but also in expensive top end brands or custom built rifles with after market barrels. If a barrel has a burred or accidentally bead blasted muzzle, it merely needs to be re-crowned. If however the barrel suffers from poor stress relieving, it needs to be replaced.If the chamber is not concentric, it will need to be rebarreled, there is no way around this unfortunately. It is actually a lot to ask of a gunsmith to determine this as an exact problem and is far easier just to start over with a new barrel.
Problems with rifle actions include poor machining of the bedding surfaces and poor locking lug contact. These problems are not common and when they arise, can usually be rectified without undue fuss. The trigger, already mentioned, is another potential problem that creates human error. The trigger is usually rectified as a part of the bedding process and is not generally looked at as an accuracy problem on its own.
A newer and ever increasing problem is the redesigning of rifle actions by firearms designers who seek to make their mark in the industry with absolutely no regard for rifle factory workers or shooters. Many so-called improvements are merely cost cutting exercises or in some cases, simply an arrogant act of pure self-gratification on the part of an individual designer. This problem seems to be more prevalent in European high-end rifles, fancy and expensive designs that depart from common sense and basic rifle engineering principles into the realms of the Emperors new clothes.
Unfortunately, the more arms manufacturers and gun store owners can erode the confidence of shooters, the easier it is to sell product and keep customers trading and buying new product. It is a big problem, especially nowadays as people take less time to explore their hobbies and more time is spent at work. By the same token, it is no conspiracy as consumers simply do not have high expectations within the sport of hunting. Basically, if you want a warranty, build a custom rifle.
Open Sighted Rifles
A great many hunters, especially younger hunters, use open sighted, sporterized, military bolt-action rifles. The big question with these is what sort of accuracy one should expect with open sights as opposed to a scoped rifle. The truth is anyone using open sights should set an expectation of accuracy almost as high as they would obtain with a scope. With care it is not difficult to shoot 1” groups at 100 yards with a rifle of known accuracy, regardless of prior shooting experience. First however we need to look at a few of the various types of open sighted rifle and suggest expected group sizes for shooters to work towards.M98 Mauser 8x57 good condition: 1” - poor condition: 3”
M93 Mauser 7x57 good condition: 1” - poor condition: 3”
M94-M96 Swedish Mauser 6.5x55 1” or less.
M94 Winchester Lever action rifle 30-30: 1”
Marlin 336 Lever action rifle: 1”
Lee Enfield No.1 Mk3 through to No.4 Mk 2: 3”
The Lee Enfield is more problematic than other arms as these were never highly accurate to begin with and many have been fiddled with since their retirement from service. Each SMLE must be studied on an individual basis, just as the factories did when selecting SMLE’s for sniper service during wartime. Sometimes an old No.1 Mk 3 will shoot 1 to 2” groups at 100 yards, other times, an ex police/tactical No.4 Mk 1 in original condition will do no better than 3”. All that can be suggested is that the shooter trusts that he or she can out shoot the SMLE.
With open sighted rifles it is equally important to sight in at 100 yards. The sights will need to be regulated to one bullet weight only. As an example, if your SMLE rifle sights are regulated to shoot 174 to 180 grain bullets dead on at 100 yards, a change to 150 grain ammunition will cause a shift in point of impact of, on average, 12”. Put simply, find either an ammo that matches your sights or match your sights to the ammo, then stick with that brand and bullet weight. Mauser actions are less prone to major shifts in point of impact with bullet weight changes. That said, the shooter still needs to choose one bullet weight for the open sighted Mauser to avoid smaller levels of deviation.
When it comes to sighting in an open sighted rifle, patience and time are vital. It sometimes helps to gently rock the rifle around to bring the sights on and off the target a few times before firing. If the sights are too shiny, take a match or candle and soot them for a clearer picture. For a target, use a white paper square of about 4” as the bull, glued onto a black background. Once group sizes have been established, the shooter can then decide out to what range the rifle can be relied on to produce clean ethical kills.
Hunting with open sighted rifles requires a lot more pre hunt practice than scoped rifle hunting. In earlier times, hunters were a lot closer to the land than today. Hunters of old knew their rifles inside and out as did soldiers and rifles were fired daily or at least weekly. Today, the hunter who only goes out a couple of times a year, shows far more respect to his or her quarry by using a scoped sporting rifle. For those who wish to use nostalgic arms, practice is the key. The open sighted rifle must either be used regularly or in a cramming session prior to hunting.
Having an accurate rifle has nothing to do with being fussy, pedantic or getting into the realms of bench rest competition. I always tell shooters that come out to our range, there is no such thing as a person who is naturally a good shot. Of course there are people with a very natural talent, mostly women. Regardless, good shooting is all about knowledge, understanding and practice. Rifle accuracy is in fact, all about respect for your quarry. People who know that their rifle is inaccurate but emphatically state that a fist sized group at 100 yards is ample for hunting out to all ranges should be treated with the same empathy that they show for their game - none. If you know better, do better.
In the field, a good hunter will always use a rifle rest wherever possible and only take free hand shots as an absolute last resort. Experienced hunters use a day bag as their rifle rest, this also ensures that they are always hunting with their over coat, food, drink and medical supplies which packed into the day bag, form the bulk for the rifle rest.
As far as buying a rifle goes, ALWAYS treat all new rifles as unfinished product “in the rough”. The sporting rifle is essentially a kit set; the manufacturer supplies the barreled action and stock. To this, the shooter adds a scope, rings and bases. To finish the job, the rifle needs to be tuned. Some rifles are more difficult to tune than others. At this time of writing, the most easily tuned production sporting rifles on gun store walls are the Remington M700’s, both wood and synthetic stocked followed by the Weatherby Vanguard / Howa rifles.
A piece of advice, bedding jobs can sometimes go wrong, whether the job was performed slapdash or performed carefully. Minute points of stress within the bedding surfaces have a dramatic affect on accuracy. In some cases the person who performed the operation may have used G-clamps to set the barreled action up in the resin. The result is that the action becomes unnaturally stressed when screwed down. This is not an uncommon problem. A more insidious problem occurs with parallel walled actions including the Howa / Weatherby, Winchester Model 70 and Sako actions. If the bedding has a 100% fit against the action sidewalls these rifles will either double group or string laterally. If the fit is too loose, the results are the same. This puts a lot of pressure on the gunsmith although the use of Latex release agents such as Brownells release agent provides the perfect relief for parallel walled actions.
Sometimes, the best assurance is to use the services of a smith who is willing to try the rifle on the range to check his own workmanship and if necessary, re-do the job (usually at his own expense). It is also a good way to get the smith to check other variables such as a faulty barrel.
Basic Ballistics
Sectional density (SD)
Sectional density (SD) refers to a projectiles weight relative to its caliber. Information derived from the SD is mostly used to compare the penetrative qualities of a projectile in one caliber over that of another.The higher the SD number, the greater the potential for deep penetration. For instance a 6.5 caliber 140 grain bullet has an SD of .287. A .308 180 grain bullet has an SD of .271. In theory the 6.5 bullet should penetrate further than the .308 offering less recoil.
However, in reality SD is one of the least significant factors affecting penetration. Bullet construction is the most influential factor. For this reason SD should be used to compare bullets of the same brand or construction type with each other.
Regardless of bullet shape the SD remains the same, for example a .308 caliber 180 grain round nosed bullet and .308 cal 180 grain BTSP both have the same SD of .271.
Being able to find the SD of a projectile is most useful as part of the equation in finding the ballistic coefficient of a projectile where no other information can be found. To find the SD of a projectile, it’s weight is converted into pounds (7000 grains to one pound) then multiplied by it’s diameter in inches squared.
Eg: To find the SD of a 180 gr .308 caliber bullet the equation is
7000 x .308 x .308 = 664.048
180 divided by 664.048 = .271
Ballistic Coefficient (BC)
The ballistic coefficient (BC) is a method of indexing projectiles to determine their ability to overcome air resistance during flight, the higher the BC the more aerodynamic the projectile. A short range round nosed projectile will typically have a BC of around .2 while modern match grade, long range projectiles have BC’s over .7.The form factor is a method of indexing the form or shape of a projectile during manufacturing and varies from company to company. Form factors are typically rated from 1 being least aerodynamic to 0.5 having a very aerodynamic shape. To calculate the BC of a projectile from scratch it is first necessary to find the form factor. Sometimes by finding at least one of a company’s BC’s for a given projectile the form factor can be worked out through trial and error and applied to other projectiles of the same brand and style. Below is a table giving an approximate guide to form factors.
| Bullet type | Form factor | Bullet type | Form factor |
| Flat nose | 1 | Nosler soft point | .585 |
| Round nose | .90 | Sierra BTSP | .58 |
| Protected point eg. Rem CoreLokt | .75 | Speer soft point | .57 |
| Sierra Gameking HPBT | .69 | Nosler BTSP | .55 |
| Sierra semi spitzer | .69 | Nosler& Hornady Polymer Tipped Boattails | .54 |
| Hornady& Sierra soft points | .66 | Hornady BTSP & Sierra match | .60 |
To calculate the BC of a projectile the sectional density is divided by the form factor.
Eg: 6.5 cal 140 gr Nosler Partition Spitzer, SD = .287
SD .287 divided by Form factor .585 = BC .49
Another factor which affects BC determination is velocity. As velocity changes the BC also changes slightly. These changes are extremely important to the ultra long range hunter and target shooter but for normal hunting, the BC can be used simply as an index for basic comparisons. It is worth noting that BC does not directly take into account bullet weight. Therefore if a 165 gr .308 bullet and 130 gr .270 bullet have the same BC and muzzle velocity, the trajectories will be identical. From a hunters standpoint this is true but at benchrest ranges of between 600 and 1000 yards heavier bullets tend to withstand cross winds much better than their lighter counterparts.
Sighting In
For many hunters the concepts involved with trajectory are extremely difficult to visualize. When a projectile leaves the barrel of a rifle it immediately begins to drop (see bullet drop table). To counteract this drop, sights are used to produce a slight upward angling of the barrel.Bullet drop table.
| Example loads | Bullet drop in inches | |||||||
| BC | MV(fps.) | 25yd | 100 | 200 | 300 | 400 | 500 | |
| .243/85gr BTSP | .3 | 3200 | .11 | 1.85 | 8 | 20 | 39 | 66 |
| .270/130gr BTSP | .4 | 3100 | .12 | 1.9 | 8.1 | 19.8 | 38 | 62 |
| 7mmRUM/162gr BTSP | .5 | 3300 | .10 | 1.6 | 7 | 16.1 | 31 | 51 |
| .308/150gr BTSP | .4 | 2800 | .15 | 2.36 | 10.1 | 24 | 47 | 79 |
The line of sight (LOS) is what the shooter sees through the scope and represents a straight line through the crosshair out to infinity. Mid range trajectory (MRT), measures the highest point the bullet will reach (due to the slight upward barrel tilt) on it’s way to it’s intended zero. It often pays to know the MRT once a rifle is sighted in as it can be very high. For example, some high capacity cartridges sighted 3” high when sighting in at the 100 yard range will strike up to 4” high at 180 yards on their way to the intended zero range, most likely 275 – 300 yards. Once the MRT is known the shooter can determine a point blank range.
The illustration below shows the relationship between MRT and LOS.
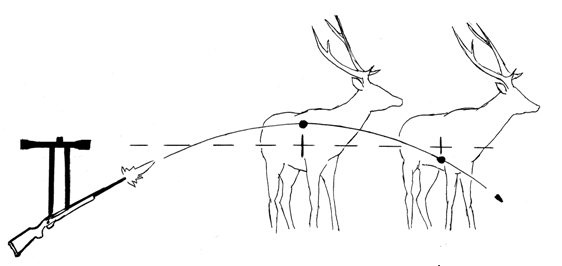
Point blank range (PBR) is a method of using the MRT figure as both the highest and also the lowest point to determine a maximum range in which the crosshair can be sighted dead center of an animal and obtain a clean kill. For example the hunter may again choose to sight the rifle in 3” high at 100 yards, knowing that the bullet will strike it’s highest point of 4” high at 180 yards. The bullet in this example will strike 4” low at 320 yards. Total deviation of the bullets path out to 320 yards is 8” allowing the hunter to not have to worry about holdover and aim dead center. The rifle in this example is therefore sighted in to have a point blank range of 320 yards with what is referred to as either a maximum or peak deviation of 8”.
Working out the point blank range may seem a touch confusing at first but once it is known is far more helpful in the field than simply knowing a rifle’s zero. The ballistic data ahead deals with a modified version of PBR which in most instances, explores the concept of "what happens when I sight in to be 3" high at 100 yards with a given load".
To work out the traditional PBR for any given rifle the hunter must decide what sized game animals will be encountered. The next step is to work out an approximate size of the intended game’s vital zones. The rifle can then be sighted to have a PBR the size, or more correctly the height, of this vital zone. For example a hunter is setting up a rifle for goats, a mature goat having a chest approximately 12’ deep. The top 2.5” and bottom 2.5” consist of cartilage and muscle leaving the vital zone consisting of spine, lungs and heart at 6”. The rifle can therefore be sighted to have a PBR of 7”
A popular game species table can be found in the appendix. The purpose of which is not only to help hunters become familiar with vital zone sizes of each species but also to help hunters relate to foreign hunting and to provide context for the cartridges mentioned throughout this knowledge base. Quoted weights and measurements are mostly based on small to average sized males to avoid over estimation of the target areas. Some of the game species listed do have extremely large vital zones however sighting a rifle in to have an extremely large PBR can have a negative effect, such as when greater accuracy is needed to place a shot at an animal through vegetation. Therefore it is important to find a balance between effective range and accuracy. For many hunters a PBR of 6” to 8” is relatively easy to envisage and compensate for in the field as a reference can be taken from the hunters hand. A rifle sighted in to be 3” high at 100 yards corresponds to the width of an adults fingers when held together while 4” is about the width of a man’s knuckles, a very useful field guide.
In the suggested loads ballistic tables ahead it may seem that the more potent cartridges are given an unfair and more flattering PBR than their milder counterparts. For instance the 7mm Rem mag seemingly shoots flatter than the 7x57 purely because the magnum has a deviation of 4” as opposed to the 7x57 at 3.5”. The reasons for this are that the higher powered cartridge carries more down range energy which can be utilized as an added margin of killing power. At the other extreme, cartridges such as the .22 centerfires need to be sighted to shoot very closely to the line of sight as often they will be used for neck shooting game. In this instance sighting 3” high at 100 yards may cause a miss if the hunter aims at the center of a neck which may in itself be only 3” wide, causing the bullet to pass over the neck by 1.5”
Wind Drift
Wind affects a projectiles flight in several ways. Head and tail winds can cause either drop or elevation. For instance shooting uphill at an extended range target, a head wind will invariably cause a slight lift of the projectile, much as an aeroplane wing harnesses air resistance. But for hunting at ordinary ranges the effects of head or tail winds are fairly insignificant.The affects of crosswinds are much more noticeable. In Alpine conditions most hunters won’t think twice about shooting at range in a strong breeze making simple slight allowances. In very high winds many hunters will pass up shots at longer ranges and try to get closer which is wise. In the ballistics tables available in this knowledge base, calculations were made based on a 10mph crosswind (at 3-Oclock). The number 10 is useful in field conditions as it can be quickly converted to 15mph for example, simply by adding another half value.
| Wind speeds and description of felt effect | |||
| mph | kmph | knots | Perception |
| 5 | 8 | 4 | Light breeze. |
| 10 | 16 | 9 | Strong breeze. |
| 15 | 24 | 13 | A true wind, put shirt on, wind can be heard in trees. |
| 20 | 32 | 17 | Strong wind, lean into slightly to walk, light weight rifles difficult to steady when aiming, game animals tending to seek shelter. |
| 25 | 40 | 22 | Very high winds, becoming impossible to steady rifles for longer range shots. |
| 30 | 48 | 26 | |
| 50 | 80 | 43 | Storm. |
The table below shows the approximate effects of different wind speeds on a .270 cal 130gr bullet from an MV of 3100fps.
| .270 Winchester 130gr bullet, BC .43, MV 3100fps | ||||
| Wind speed | Range in yards | |||
| MPH | Kmph | 100 |
200 |
300 |
| 10 | 16 | .6 | 2.4 | 5.6 |
| 15 | 24 | .9 | 3.6 | 8.4 |
| 20 | 32 | 1.2 | 4.8 | 11.2 |
| 25 | 40 | 1.5 | 6 | 14 |
| 30 | 48 | 1.7 | 7.2 | 16.8 |
The .308 Win shows even more dispersion in the table below.
| .308 Winchester 150gr bullet, BC .38, MV 2800fps | ||||
| Wind speed | Range in yards | |||
| MPH | Kmph | 100 |
200 |
300 |
| 10 | 16 | .8 | 3.2 | 7.5 |
| 15 | 24 | 1.1 | 4.8 | 11.3 |
| 20 | 32 | 1.5 | 6.4 | 15 |
| 25 | 40 | 2 | 8 | 18.8 |
| 30 | 48 | 2.3 | 9.6 | 22.6 |
Shooting up and down hill
One of the more confusing issues for hunters is where to aim on up and downhill shots. Put simply, gravity has it’s strongest affect on projectiles traveling parallel to the earths plane. At acute angles when projectiles are traveling up and away from gravity’s pull or down and toward gravity’s pull, bullets have less drop. Whether shooting up or downhill the results are similar, requiring the hunter to aim low.Just how much effect slope has on trajectory depends and varies greatly with angle. Most people tend to over estimate slope, coming up with figures of between 20 and 30 degrees for slopes of around 15 degrees. A slope of 15 degrees is generally easy walking where as a slope of 30 degrees gives cause to sidle. Slopes of 60 degrees are usually precipitous,often experienced when shooting in alpine country.
The tables below show the effects of shooting a .270 and .308 at varying angles. The first line of each table shows how they have been sighted in on flat land.
| .270Winchester 130gr, BC .43, MV3100fps | |||||
| Angle | 100yd | 150yd | 200yd | 300yd | 400yd |
| Flat | +3” | +3.75” | +3.4” | -1” | -10.9” |
| 15deg. | +3.1 | +3.9 | +3.7 | -0.4 | -9.7 |
| 30deg. | +3.3 | +4.3 | +4.4 | +1.5 | -6.2 |
| 60deg. | +4 | +5.9 | +7.3 | +8.3 | +6.6 |
| .308Winchester 150gr, BC .38, MV2800fps | |||||
| Angle | 100yd | 150yd | 200yd | 300yd | 400yd |
| Flat | +2” | +1.8” | +0.2” | -7.7” | -22.9” |
| 15deg. | +2 | +2 | +0.5 | -6.9 | -21.4 |
| 30deg. | +2.3 | +2.5 | +1.5 | -4.5 | -17 |
| 60deg. | +3.1 | +4.5 | +5.2 | +4.1 | -0.7 |
Both cartridges show mild differences when fired at angles of up to 30 degrees. Aiming slightly below center of most game will give reliable kills. Above 30 degree differences become marked. For steep, same side alpine shots at ranges between 150 and 200 yards (the highest point in each trajectory) the hunter would need in these examples to aim close to the bottom line, about 1 quarter of the way up the animal.
Long range shooters have to make considerable allowances for angle of elevation. As an example, neglecting to allow for a 15 degree angle will in many instances, result in a complete miss at long ranges.
Altitude and Humidity
The effects of either of these are relatively small for most hunters world wide. The differences account for around half an inch dispersion in trajectory at longer ranges. That is to say, at high altitudes most cartridges will shoot about .5 of an inch flatter at 300 yards than when used on lower lying areas. Both altitude and humidity are far more important to long range hunters and snipers at ranges beyond 500 yards. For this type of hunting, ballistics computation either from software or pre-generated field tables is vital for extreme accuracy of calculations.Abbreviations (Other terminology used throughout the knowledge base)
Observed MV - Observed (average) muzzle velocity, this abbreviation is used in the tables ahead. Instead of using either factory stated test barrel velocities or biased data from my own rifles the Observed MV is taken from an average of a statistical survey of velocities achieved from a number of sporting rifles.FL - Factory load.
HL – Hand load.
SP – Soft point, spire point or spitzer. The word spitzer is derived from the German word Spitzerchossen meaning pointed bullet.
SPBT – Or SPT, Soft point boattail, spire point boat tail or spitzer boattail. This means the projectile has a tapered base to reduce drag and therefore increase aerodynamics. Sometimes authorities will state that a boattail bullet has little advantages over the basic flat based soft point at normal hunting ranges. Although this is true the boattail bullet can have advantages in windy terrains such as those typical of NZ hunting areas. In other instances large calibers which are to be used on deer sometimes require light for caliber bullets to produce fast kills, for example a 150 to 160gr 8mm bullet would benefit from a boattail and long hollow point to increase it’s poor BC of .35 to around .45.
POI – Point of bullet impact relative to the line of sight.
FP – Flat pointed bullet.
HP – Hollow point.
FMJ – Full metal jacket bullet.
SIL – Silhouette Bullet.
RN – Round nose bullet.
JFP – Jacketed flat point bullet.
JHP – Jacket hollow point.
MOA – Minute of angle, a method of measuring and describing bullet drop for reference at range. MOA is an Artillery unit of measurement based on a circle, at 360 degrees, divided in minutes of angle (or ark). MOA is also often used to describe group sizes. By sighting in at 100 yards and then measuring group size the shooter can then predict group sizes at 200, 300 and 400 yards etc. 1 MOA converts to 1.047". At normal hunting ranges of out to 300 yards, the two units MOA/1" can be interchanged without regard for error. At longer ranges, accumulative error creates large differences between the two units of measurement. Therefore, long range hunters must learn to use MOA and understand the differences between MOA and inches relative to the dial calibration of their optics. MOA is the most common unit of measurement for scope elevation and windage adjustments in long range hunting / tactical scopes.
Discuss this article or ask a question on the forum here
Copyright © 2007-2011 Terminal Ballistics Research, Ballisticstudies.com
|
|||||||||
|
|||||||||
|
|||||||||
FOUND THIS ARTICLE HELPFUL?If you find the resources on this website to be valuable, we would be sincerely grateful if you would consider making a donation to help us cover the costs of the website and to assist us to continue our research and testing into the future. It doesn't matter whether your donation is big or small - it makes all the difference! |
|||||||||

ABOUT USWe are a small, family run business, based out of Taranaki, New Zealand, who specialize in cartridge research and testing, and rifle accurizing. |
KNOWLEDGEBASE |
KNOWLEDGEBASE |