|
|
|

Discussion Forums
Forum Index
> Rifles general discussion
> Tikka T3 build/bedding
Tikka T3 build/bedding

@ 01:05 am (GMT) |
Martin TaylorG’day All,Just thought l would post my new build, a Tikka T3 S/S 9.3x62 to show how l go about building up a rifle with Nathan & Steph’s help! It is being built as a stalking/hound hunting gun for use in our Alpine areas, targeting mainly Sambar deer. Robustness, reliability & practicality are the main priorities for this build along with being suitable for my sons to use if needed! l like all my rifles to group consistently so bedding is a must for long term repeatability. I will be using a TBR bedding kit and under Nathan & Steph’s guidance, even though they are in another country! After a wet day or weekend hunting l need to be able to strip, clean & reassemble knowing the zero is spot on! The stock is a Laminated Boyd’s Classic that l will modify to suit personal taste, increase grip levels and dull recoil with its extra weight along with a Limbsaver recoil pad. A stainless cnc’d recoil lug will be fixed into the bedding to replace the steel lug supplied by Boyd’s. This will leave the original stock to be stabilised & bedded as a light weight alternative if needed later on. Should be fun, I will post some pics when l start it over the weekend! Cheers Marty |
Replies

@ 03:06 pm (GMT) |
Paul HorwathRe: Tikka T3 build/beddingQuote: Regarding pillars. If you want metal to metal contact, the pillar must be attached to the action- then set down into the mortice. In other words, the action and pillars are bedded at the same time.
Hope that makes sense. Thanks for the tips Nathan. My plan is to bed the pillars only in the first glass bedding step. Both pillars will be securely screwed down to the action, as you recommend, and the barreled action with pillars attached will be lowered into the stock. Then after the initial bedding of the pillars, I'll relieve the Manners stock to obtain the void for the glass bedding of the entire action. The entire action will be bedded in a second step. At that point, the pillars will become my two support points between the stock and the barreled action. No other contact points will exist between the barreled action and stock. Only the two points of contact at the pillars. So the recoil lug and the rest of the action, to include the recoil lug, won't get set into bedding material until a second glass bedding application. When the entire action is bedded, I'll torque the action screws down to maybe 1/2 their final torque settings fixed hard between the action and the aluminum bottom metal, and let the glass bedding material set up. At least that's my planned approach! Paul |

@ 03:49 pm (GMT) |
Glenn EdwardsRe: Tikka T3 build/beddingHey Paul see what the others have to say about this but the way I see it you'll need to do this all in one hit to avoid that .1 - .2 shim of compound Nathan mentioned. There is no way you'd get the action down on those pillars without getting bedding compound between. Or you could countersink/recess the pillars and rely on other methods for setting action hight. Love the shim idea for the recoil lug, I have bedded a Sako 85 in the same way but used insulation tape to relieve and glued the lug in. The dry fix is the way forward I reckon. cheers |

@ 04:22 pm (GMT) |
chris murphyRe: Tikka T3 build/beddingHi Paul you will want more than just the pillars contacting the action they may produce undesirable results this is the reason for bedding the action and start of the barrel to give it a mirror image of itself in the stock. unless i am miss understanding your plan i suggest setting the pillars in and trim them so there is 1.5mm of compound between them and action. if you haven't already watch nathans bedding clips on youtube |
|
@ 05:17 pm (GMT) |
Paul HorwathRe: Tikka T3 build/beddingHi Glenn,My description of my process was probably not very clear. When I bed the pillars alone into the stock in the first step, the action screws will be tightened down on the pillars, forcing the pillars into firm contact with the imprints from the two bosses on the bottom of the action. The aluminum pillars will be impacting the base of the action with 45 inch-pounds of torque applied to the two action screws. After the bedding compound sets the pillars permanently into the stock, I'll relieve the glass bedding surrounding the pillars in the stock, as well as 1/16" to 1/8" of the stock material to accept that thickness of glass bedding compound. During this 2nd glass bedding operation, the surface of the two aluminum pillars (which will already have been firmly glued into the stock) will again be pulled down flush against the base of the action using the action screws (this time thru both the trigger guard and the pillars, drawing the pillars into metal to metal contact with the bottom of the stainless steel receiver. The two pillars, setting proud of the rifle stock, will become the only points of contact between the barreled action and the stock. Held tightly together with the two action screws. Instead of leaving some of the stock material for the support of the barreled action as Nathan describes in his instructional materials, I'll torque the barreled action down onto the pillars, and the barreled action will be solely supported by the two aluminum pillars. No glass bedding material will remain between the aluminum pillars and the stainless steel action during this 2nd glass bedding step. Then after the barreled action is removed from the stock, I'll use the Dremel tool with the carbide burr to carefully relieve the rear imprint ridge from directly behind the two bosses on the top of the pillars, in order to ensure the two bosses don't try to lift the action upwards under recoil. And as Martin advised, in order to prevent these two bosses from acting as two additional mini recoil lugs. Hope this makes sense? Why you will ask, separate the bedding into two steps versus completing the bedding in one step? Since I'm bedding aluminum pillars into the action, I prefer to use the two pillars as support for the second glass bedding step, in order to reduce the potential for any stresses or strains being placed on the barreled action by support/contact points located anywhere other than directly adjacent to the two action screws. Now I'm not taking credit for originating this two-step pillar glass bedding process. I came up with this the easy way, by learning from others. Here's a link to a gunsmith that's been using this method of pillar bedding for the past 37 years. After reading his process, I liked this 2-step method for pillar bedding better than bedding everything in one step. If I wasn't installing the aluminum pillars in this aftermarket Manners stock, I'd go ahead and bed the entire barreled action in a single step as Nathan advises. Here's that link to erniethegunsmith.com 2-step pillar bedding description: http://erniethegunsmith.com/catalog/c41_p1.html |
|
@ 05:30 pm (GMT) |
Paul HorwathRe: Tikka T3 build/beddingQuote: Hi Paul you will want more than just the pillars contacting the action they may produce undesirable results this is the reason for bedding the action and start of the barrel to give it a mirror image of itself in the stock. unless i am miss understanding your plan i suggest setting the pillars in and trim them so there is 1.5mm of compound between them and action. if you haven't already watch Nathan's bedding clips on youtube
Thanks again Chris. Please see my prior post for a more thorough description of the 2-step bedding process I plan on using. I read of this 2-step process from that web site. It is a deviation from Nathan's process, when aluminum pillars are not being used. If I was bedding my barreled action in the factory Tikka T3 plastic stock, and not pillar bedding with the aluminum pillars, I would go about it just like Nathan recommends. however with the use of the aluminum pillars, it makes sense to me to use the two pillars as the sole points of support for the action during a 2nd (separate) glass bedding step, in which the entire action is then laid into the glass bedding compound. Again, I'm swayed to the two-step process because with the pillars, it made the most sense to support the action directly off the pillars, as close to the two fastening action screws as possible, in order to minimize the potential for placing the action into a stressed position while the glass bedding material sets up. I'm completely open to everyone's thoughts and feedback. It'll be another month before I glue the pillars into my stock. I've already received good tips specific to bedding the Tikka T3s from you and others. Appreciate the help! |
|
@ 06:45 pm (GMT) |
Martin TaylorRe: Tikka T3 build/beddingl have used this style of pillar bedding with Boyd's stocks and had good results Paul, although not with Tikka actions.I combine the two styles now and prefer a slightly modified but basically the same as Nathan’s, letting the compound form the bed. On a side note; When bedding the heavy barrelled Remington’s l found that the barrel needs supporting (plasticine dam and barrel tape) as the actions are too flexible to have such a heavy lever (barrel) hanging off the screws whilst sitting in the mortar, but others may have different findings. This is “as stress free as the action can be” in my book, totally free floating in a fluid bedding compound. |
|
@ 12:07 am (GMT) |
Paul HorwathRe: Tikka T3 build/beddingInteresting. I've order the aluminum Bottom Metal from Atlasworxs and I'm on hold until I have it in my hands. I don't want to bed the pillars or the action without having the BM.I've reviewed another method of glass bedding from Richard Franklin. That provides me with three different methods to consider. After I inspect the BM, I'll have to select a method and get on with it. I'll post some pics and thoughts on the Atlasworxs bm after I have it in hand and can see how it fits and compares to the Tikka T3 plastic BM. Paul |
|
@ 03:35 pm (GMT) |
Martin TaylorRe: Tikka T3 build/beddingGo with the process that you are most confident using Paul!Many ways to skin the cat and all that stuff. Just remember free fowing compounds like Nathans will run anywhere it can, which is what helps make it work so well. |

@ 02:33 am (GMT) |
Ben LawRe: Tikka T3 build/beddingafter a long wait for my 225gr sst's, being busy with work, family etc i loaded up my 1st batch of test loads and got out to the range today.in the mean time i've had the trigger lightened to 1 & 1/4 lb, and fitted a hss clamp on muzzle brake. powder is adi ar2209, cases were winchester, once fired and neck sized with the lee collet die using winchester lrm primers. groups were 3 shots. 63 - .762" 63.5 - 1.233" 64 - 1.132" 64.5 - 1.469" 65 - .815" 65.5 - .574" 66 - 1.287" pretty happy with the results. 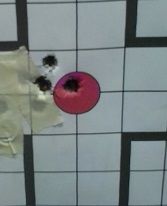
|
|
@ 07:58 pm (GMT) |
Martin TaylorRe: Tikka T3 build/beddingGreat to see some results from all your efforts Ben, now you have something to work with.Once you get a load finalised it would be an interesting test to see how it performs without the brake. Good stuff! |

@ 02:55 pm (GMT) |
John RiddleRe: Tikka T3 build/beddingHello guys, Im new to the site and have read all your posts and looked at all your pictures probably 2 dozen times now! Thought it was probably time to join the group and register as a member. I had a couple of quick questions regarding my first bedding job, on a tikka t3 with the factory synthetic stock. I purchased a titanium lug and pillar kit, the lug is substantially thicker than the aluminum lug, so thick it fits the action great, but leaves no room to tape the back side of the lug. I used a feeler guage set and have a tight .002" clearance between the lug and action. Using masking tape or electrical tape it just wrinkles and peels off trying to force the lug into the action...Any suggestions? Also the lug overhangs the actions by a fair bit, about the same as the factory lug, when I tape the top of the lug(part that contacts the action) off for clearance, do I tape the entire portion of the lug including the overhang on either side, or do I only tape the lug that contacts the action, leaving the ends of the lug not taped so compound will fill over the overhang? Thanks |
|
@ 07:28 pm (GMT) |
Martin TaylorRe: Tikka T3 build/beddingWelcome John,you should find some great info on Nathan's site and here hopefully! I always suggest Nathan's books to help guide people with their rifles and techniques which still helps me know, but we should be able to help you a bit as well. The lug you have is very tight, only tape the top surface that contacts the action not the exposed areas that end up captive in your bedding. Glue the taped lug in place with some super glue or epoxy using as little as possible to hold the lug in the action. You will need to wedge your feeler gauge in to push the lug hard against the front working face, then fill the very small gap left with release agent. You don't have a lot of room to play with and it may even be on the smaller side of what’s needed for the action to move in & out of battery, Nathan will have the answer to that with his experience. Hope that helps you a bit, Marty |

@ 08:19 pm (GMT) |
Nathan FosterRe: Tikka T3 build/beddingHi John, welcome aboard. I would prefer to see you sand the rear face of the lug so that the action can return to battery after bedding for optimum accuracy. If you do not do this, the rifle may double group.When taping, trim the tape as you have suggested. Do not tape the overhang. |

@ 11:01 pm (GMT) |
Thomas KitchenRe: Tikka T3 build/beddingwelcome john you come to right place if you want to learn there is a lot of great people on here willing to share there knowledge.as a fellow tikka owner i have a question. in this case would it be easier to use factory recoil lug? |
|
@ 12:15 am (GMT) |
Martin TaylorRe: Tikka T3 build/beddingI would take it down on some wet and dry to get a bit more clearance, only the top3-4mm being critical.Most prefer the stainless lug when bedding due to its lack of wear over time Thomas, the lug l used is made on a cnc machine here in oz and has identical dimentions to the original. In saying that though many are bedded on the originals, think my son's 308 has the alloy one still! "Old timers" is kicking in.....stuffed if l can remember, but l'm sure it is. |
|
@ 01:20 am (GMT) |
Thomas KitchenRe: Tikka T3 build/beddingcheers for that martin makes sense to change it while your bedding it then. i'm hoping i can get away with not bedding mine til i have to rebarrel it. |
|
@ 11:06 am (GMT) |
John RiddleRe: Tikka T3 build/beddingWOW...this website is astonishing! I cant belive Im only joining now! So I sent my devcon 10110 back to the store I bought it from and ordered Nathans Stabilizing kit and Bedding kit, I figure if a man as busy as Nathan can reply to a post for a new comer like myself, I will support him in any way possible! So I will wet sand the ss lug to gain a few thousands clearance, I will tape the lug as suggested, I have went through the tutorial on stabilizing and am prepping my stock now, I have already keyed into the action area and removed approx 060" , leaving a height reference at the tang and taped the barrel to give a refrence at the front. 1 question I have is along the top line of the stock and action, how much should be sanded away to allow for bedding, my tikka action litterally touches the stock the whole way around the action on the parallel section. Also when I test fit the action in the stock I wonder about the area of the stock where the saftey lever comes through. I have already keyed this area, so do you rely on plastercine in the action to leave a clean line of bedding compound in this area? Thanks in advance guys! Martin, I will be ordering all of Nathans books as soon as possible! [b] |
|
@ 04:34 pm (GMT) |
Martin TaylorRe: Tikka T3 build/beddingGreat move John,Nathan spends many hours every day answering questions from all corners of the world so we all need to continue to support him and the service he offers to all. The side of the action will need the same 60 thou clearance. My minimum is out to around 080. l ‘m not into cosmetics or the looks, l want my bedding strong with no thin sections to possibly break away. Thin edges or corners may flake away with use or whilst machining away the excess compound. Keep your keying in ruff & clean as on previous pages because of the greater need for mechanical lock on the "plastic" stocks. Yes your plasticine will allow you too smooth of recesses in the action & stock, think there is a picture of mine on the previous pages, ready to fit with the lug glued in place, guide studs, plasticine smoothed and release agent applied. |
|
@ 05:10 pm (GMT) |
Nathan FosterRe: Tikka T3 build/beddingThanks for the order John, much appreciated. Thanks Marty for the help.Did Marty cover that clearly enough John? Remember, a burn prep is most important after you have removed your 60 thou. Use a gas cooker or blow torch to heat a knife and or hot wire. The knife prep should appear like corduroy pants in the stock (finish looks like dragging a fork through a freshly iced cake). This will burn out petroleum and also create the mechanical locks Marty talked about. When stabilizing, make sure you fill any skeletal voids in the action area, not just the forend. To sand the lug, place a fresh sheet of sand paper (120-180gr) on a dead flat surface, then push the lug back and forth. Finish with 240 or 400gr. You really only need just enough clearance for the tape. factory clearance is .2mm / 10 thou. During the final stages of prep, if your nerves get the better of you, contact me. You can email photos for me to check. Please include your phone number. |
|
@ 04:44 pm (GMT) |
Thomas KitchenRe: Tikka T3 build/beddingbit off topic but was doing some research bout rebarrelling my tikka to 284 win when i burn out my 270win ( miles away but had some spare time to research) any way came across this 2nd picture down looks like more of a remington style recoil lug. think would limit your stock options and no need for it just wonder what peoples opinion werehttp://www.tikkashooters.com/al-quasts-284-winchester-throws-down-the-hammer-august-2013-tikka-of-the-month/ |
|
@ 10:24 pm (GMT) |
Nathan FosterRe: Tikka T3 build/beddingThats an interesting job for sure. The front of the action has been cut / faced off completely to remove the action taper, then fitted with the lug. |
|
@ 04:30 pm (GMT) |
Martin TaylorRe: Tikka T3 build/beddingThat’s a nice job!Would be a good option for the bigger calibres, spread the recoil energy over a larger lug area, instead of the small shoulder. Guess it would help make the bedding process easier for people to get their heads around as well. |

@ 06:46 pm (GMT) |
Ben GradyRe: Tikka T3 build/beddingQuote: Thanks for the order John, much appreciated. Thanks Marty for the help.
Did Marty cover that clearly enough John? Remember, a burn prep is most important after you have removed your 60 thou. Use a gas cooker or blow torch to heat a knife and or hot wire. The knife prep should appear like corduroy pants in the stock (finish looks like dragging a fork through a freshly iced cake). This will burn out petroleum and also create the mechanical locks Marty talked about. When stabilizing, make sure you fill any skeletal voids in the action area, not just the forend. To sand the lug, place a fresh sheet of sand paper (120-180gr) on a dead flat surface, then push the lug back and forth. Finish with 240 or 400gr. You really only need just enough clearance for the tape. factory clearance is .2mm / 10 thou. During the final stages of prep, if your nerves get the better of you, contact me. You can email photos for me to check. Please include your phone number. I wonder if a cheap soldering iron would work for the burn prep? Might be an easy way of melting the plastic (if it gets hot enough) |
|
@ 08:06 pm (GMT) |
chris murphyRe: Tikka T3 build/beddinga soldering iron does work ive done 3 job with one |
|
@ 02:41 pm (GMT) |
Paul HorwathRe: Tikka T3 build/bedding - Atlasworx AL Trigger GuardReceived my aluminum trigger guard for my Tikka T3. Below are some photos and some comments:
One difference between the Atlasworx bottom metal and the factory trigger guard are the shape of the surface where it mates to the stock at the location of the front action screw. My factory BM has a round plastic protrusion that rests against the stock. The Atlasworx has a rectangular shaped protrusion. This difference could prevent swapping back to the factory trigger guard was set in bedding material. I bedded the pillars in my Manners stock using the factory trigger guard, so there was no interference when swapping over to the Atlasworx BM with the narrower protrusion. Another difference is the relief of the BM around the trigger. I don't particularly care for this larger opening on the Atlasworx BM. My thought is that is could increase the odds of dirt getting into the trigger assembly area. Here's a side view comparing the two trigger guards: 
The Atlasworx BM has a larger opening around the trigger, which would allow easier access to the trigger while wearing glove. 
There's also more material surrounding the trigger on the Atlasworx BM, compared to the factory BM. A more rigid, rugged enclosure encircles the trigger. Another difference - the Atlasworx action screws milled reliefs DO NOT accept tapered action screws. Flat heads screws will need to be used. I custom fit two thin stainless steel washers and JB Welded them into the recesses of my Atlasworx BM, so the action screws would be steel bearing against steel rather than steel heads on the screws against the aluminum BM. You can sorta see the SS washers down in the action screw recesses in this photo. Another photo of the bottoms of the two trigger guards. 
A photo of the Atlasworx BM installed on my Tikka T3. 
A few pictures of the finished pillar bedding of my Manners aftermarket stock. 

I used a small carbide burr in a Dremel tool to relieve the shoulders around each both action screws, in order to remove these false shoulders that could lift the action under recoil. |
 Please wait
ABOUT USWe are a small, family run business, based out of Taranaki, New Zealand, who specialize in cartridge research and testing, and rifle accurizing. |
KNOWLEDGEBASE |
KNOWLEDGEBASE |